Why Your Sewing Machine Needs Regular Cleaning and Oiling
A sewing machine is a mechanical device. Hundreds of metal parts moving against each other, thousands of times per hour. Without lubrication, that’s metal grinding on metal. Without cleaning, it’s lint and thread fragments jamming up every moving part.
Here’s what I see most often when I open a neglected machine:
- Compressed lint packed around the bobbin and hook mechanism — thick enough to slow rotation
- Old oil turned to varnish — it stops lubricating and starts gluing parts together
- Thread fragments wrapped around shafts and cams, creating drag and resistance
The machine doesn’t fail suddenly. It degrades slowly. First it gets louder. Then stitches become uneven. Then it skips stitches. Then it jams. By that point, what could have been a 15-minute maintenance job becomes a costly repair.
How Often Should You Clean and Oil?
This depends on how much you sew. Here’s what I recommend:
| How You Use Your Machine | Clean the Bobbin Area | Oil Moving Parts | Full Deep Service |
|---|---|---|---|
| Occasionally (a few times a month) | Every 3 months | Every 6 months | Every 3–5 years |
| Regularly (weekly sewing) | Every 2–4 weeks | Every 1–2 months | Every 1–2 years |
| Heavy use (daily, professional) | Weekly | Every 2–3 weeks | Once a year |
| After long storage | Before first use | Before first use | Inspect condition |
First warning sign: if your machine has gotten louder than usual, don’t wait for the next scheduled maintenance. Clean and oil it now.
What You’ll Need
You don’t need much. But what you use matters.
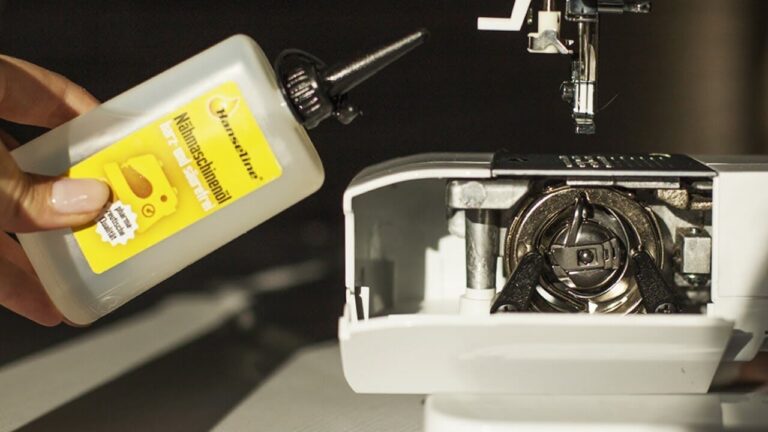
Sewing machine oil — clear, thin mineral oil made specifically for sewing machines. It comes in a small bottle or plastic oiler with a long tip for precision application. This is non-negotiable: use the right oil. → Check price on Amazon
Thick grease — lithium grease or white grease for gears and cams. Not needed for basic maintenance, but important for deep servicing. → Check price on Amazon
A stiff brush — the small brush that came with your machine works perfectly. An old toothbrush also does the job. → Check price on Amazon
Soft lint-free cloth — for wiping away old oil and dust. → Check price on Amazon
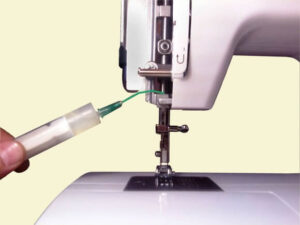
A syringe — a standard disposable syringe (without needle) is the best tool for applying oil precisely. One or two drops in exactly the right spot — no mess. → Check price on Amazon
Screwdrivers — Phillips and flathead, depending on your machine. → Check price on Amazon
Disclosure: Links above are affiliate links. This means I may earn a small commission if you purchase through them — at no extra cost to you. This helps me keep creating free, helpful content. As an Amazon Associate, I earn from qualifying purchases.
Step 1: Clean the Bobbin and Hook Area
This is the most important step. The hook mechanism rotates hundreds of times per minute and collects more lint than anywhere else in the machine.
If you have a top-loading (horizontal) bobbin:
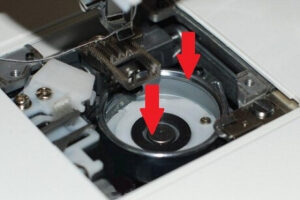
Most modern domestic machines — Singer, Brother, Janome, Bernette — use this system.
- Remove the bobbin cover plate (usually one or two screws, or a simple snap-off panel).
- Take out the bobbin and the bobbin holder insert.
- Use your brush to sweep out all lint, thread bits, and dust. Pay close attention to the area around the rotation point at the bottom of the compartment.
- Wipe everything with a soft cloth to remove old oil residue.
- Apply one drop of sewing machine oil on the small bearing at the bottom of the compartment, and one drop on the rim where the insert makes contact.
- Reassemble carefully — align the arrow on the insert with the marking on the machine. Turn the handwheel a few times. The movement should feel smooth and quiet.
If you have a front-loading (vertical) bobbin:
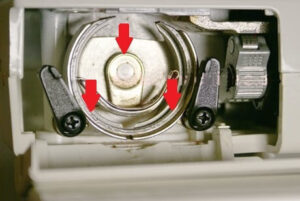
Older domestic machines, many industrial machines, and some vintage models use this system. Metal moving against metal — this one genuinely needs oil.
- Remove the bobbin case.
- Open the two latch holders that secure the stopper ring.
- Remove the stopper ring and the hook (shaped like a half-moon).
- Brush out all lint and old grease thoroughly.
- Apply oil to: the full circular surface where the shuttle carrier meets the hook; underneath the hook driver; along the edge of the hook itself.
- When reassembling, add a drop of oil to the contact point between the hook and the stopper ring, and one drop on the bobbin holder shaft.
- Turn the handwheel several times to distribute the oil evenly.
If your machine has gotten noticeably louder — this is almost always where the problem is.
Step 2: Oil the Needle Bar
This part gets overlooked constantly. And when it runs dry, here’s what happens: the needle bar develops play. Small amounts of wobble. The result — skipped stitches, inconsistent tension, thread looping on the underside of your fabric.
- Remove the side panel of your machine (usually two screws). This is what gives you access to the mechanism.
- Lay the machine on its side.
- Apply one drop of oil to the upper bushing and one drop to the lower bushing that hold the needle bar in place.
- Turn the handwheel slowly and watch the oil work its way through the movement.
While you’re here with the handwheel turning — look at what else is moving. Every joint, every rod, every cam that moves and touches another part: that’s where a drop of oil goes.
Step 3: Check the Upper Shaft and Lower Shaft
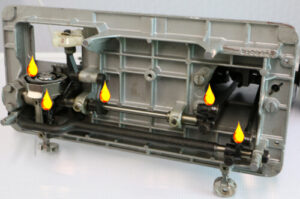
These two shafts run the length of the machine and drive both the needle bar mechanism and the hook system. They sit in felt or foam-padded bushings that absorb and hold oil.
When you do a deeper service (every couple of years), these felt pads need to be re-saturated. You’ll see them once the side or bottom panels are removed — small round or rectangular pads sitting next to the shaft. Apply a few drops of oil directly onto the pad. It’ll hold the oil and slowly release it during use.
The bottom shaft is accessible by tipping the machine on its side and removing the bottom plate (usually four or five screws).
Step 4: Gears, Cams, and Eccentric Parts
Once you’re into a deeper service, anything that meshes, pivots, or rubs gets attention. Metal parts get sewing machine oil. Plastic gears — like the half-gear that drives the feed mechanism on many machines — get a small amount of thick white grease or lithium grease applied to the teeth.
Don’t over-apply. A thin, even coat is better than a thick blob that flings off during operation.
How to Clean and Oil a Sewing Machine
The Step Everyone Skips (Don’t)
You’ve cleaned everything. You’ve applied oil to every point. Now you’re ready to sew, right?
Wrong.
Put a scrap of fabric aside. Raise the presser foot. No thread in the machine. Now run the machine at slow to medium speed for two to three minutes — completely unloaded.
Here’s why this matters: fresh oil needs to warm up slightly and spread across all the contact surfaces. Running the machine unloaded does that. It also pulls excess oil out of the system — oil that, if you started sewing immediately, would end up as a stain on your fabric.
After the idle run, wipe the hook area and needle bar with a cloth. You’ll see oil on it. That’s the excess coming out. Good. Now you can sew.
On light-colored fabric especially — this step saves you a lot of frustration.
Storing Your Machine the Right Way
A machine that sits unused is not a machine that takes care of itself.
Short-term storage (a few weeks to a few months):
- Cover it — even a pillowcase works — to keep dust off.
- Store in a dry room. Humidity is the enemy of metal.
Long-term storage (six months or more):
- Before putting it away, run a quick clean and oil cycle.
- When you take it back out, clean and oil it again before using it.
- Run it unloaded for a few minutes at low speed before sewing.
If it was stored in a damp place: You may see surface oxidation on metal parts. Don’t panic — it’s usually surface-level. Start the machine slowly, at low speed, without heavy fabric. The movement will gradually work the oxidation off the surfaces. Don’t push it hard right away.
If there’s visible rust on the hook or needle bar, that’s a different situation — it needs proper treatment before you can sew safely.
Alex is a sewing machine mechanic with 20+ years of experience on domestic and industrial machines — sharing practical knowledge to help sewers take care of their own equipment.