7 Best Presser Feet for Sewing Machine

A Mechanic's Honest Guide

Here’s something that surprises me after twenty years of fixing sewing machines: the biggest thing holding most home sewers back isn’t a broken machine. It’s the fact that they’re still using the one presser foot that came in the box. That universal foot is fine — don’t get me wrong. But relying on it for every single project is like trying to cook every meal with just one knife.

Here’s something else nobody talks about: using the wrong presser foot doesn’t just give you a bad stitch. It puts unnecessary stress on the needle, the feed dogs, and the fabric feed mechanism. Over time, that kind of strain adds up — and the repair bill that follows is always bigger than the cost of a few specialty feet. The right accessory protects your machine just as much as it protects your project.

The good news? Presser feet cost next to nothing compared to a new machine or a trip to the repair shop. The tricky part is knowing which ones are actually worth buying. So below I’ve put together seven feet that I genuinely recommend to my own customers — no fluff, no filler. Stick around to the end: I’ll cover two things that most people miss even after they buy the right foot.

best presser feet for sewing machine

What Is a Presser Foot and Why Does It Matter

The presser foot is the small attachment that holds your fabric in place as the needle stitches. The standard foot handles cotton, linen, and everyday fabrics just fine. But it has no groove for a zipper, no Teflon coating for leather, no curling channel for a rolled hem. Each specialty foot is engineered to solve one specific problem — and when you use the right one, the difference is immediate.

Swapping a foot takes about fifteen seconds. The results last the entire project.

7 Presser Feet That Belong in Every Sewing Kit

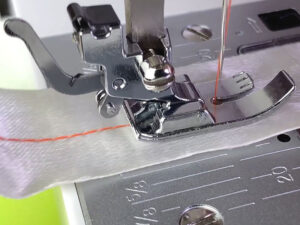
1. Overcast Foot — Clean Edges Without a Sergerbest presser feet for sewing machine

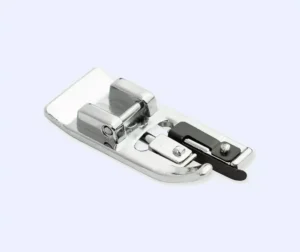
Let’s be honest: a regular sewing machine will never truly replace a serger. The stitch mechanics are completely different. But if a serger isn’t in the budget right now, an overcast foot gets you surprisingly close.

It has a small guide pin that holds the thread in place and prevents it from pulling the fabric edge into a twisted rope. A standard zigzag foot on a raw edge — especially on synthetics — often creates that messy rolled effect that unravels after the first wash. With an overcast foot, the edge lays flat, looks clean, and holds up.

This is the first foot I recommend to anyone who sews garments rather than just hemming dish towels.

Thinking about whether a serger might be worth it for your workflow? I’ve written a full breakdown of what a serger actually does and how it differs from a sewing machine, and put together a roundup of the 5 best home sergers — both are in the blog if you want to dig deeper.

One thing to check first: before you start, manually turn the handwheel to confirm your zigzag width clears the guide pin. If the needle hits that pin, you’ll be shopping for a new needle — and possibly a new good mood.

👉 Overcast foot on Amazon

2. Invisible Zipper Foot — The Difference Between Homemade and Store-Boughtmust have sewing machine feet for beginners

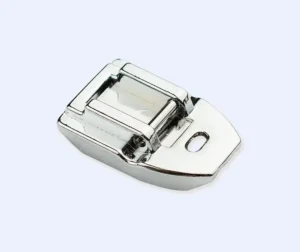
A regular zipper? You can technically install it with a standard zipper foot. It’s not fun, but it’s doable. An invisible zipper is a different story. The whole point of an invisible zipper is that you can’t see it from the outside. At all.

This foot has two deep grooves on the underside that unroll the zipper coil as you sew, letting the needle stitch right up next to the teeth. Without it, you’ll always see a strip of zipper tape peeking out — and anyone who sews will spot it immediately.

My recommendation: go with a metal version. It holds the plastic coil steady and doesn’t flex or wobble mid-seam.

👉 Invisible zipper foot on Amazon

3. Straight Stitch Foot — Finally, a Seam That Doesn’t Wander


must have sewing machine feet for beginners

Struggling to sew in a straight line? Before you blame your hands, check your foot. The standard presser foot has a wide needle opening designed to accommodate zigzag stitches. That extra space lets the needle shift slightly as it pierces the fabric — especially on thin or loosely woven materials. The result is a seam that drifts.

A straight stitch foot has a tiny, needle-sized opening. That’s it. No room to wander, no room to shift. Every stitch lands exactly where it should. As a bonus, it also solves the skipped stitch problem on silk and batiste, where a wide-opening foot often misses the fabric altogether.

Quick tip: match your needle size and thread weight to your fabric. The foot helps a lot, but if your needle is too fine for the material you’re working with, skipped stitches will still happen.

👉 Straight stitch foot on Amazon

4. Knit Foot (Stretch Foot) — Sew Knits Without the Drama

must have sewing machine feet for beginners

Knit fabric is where a lot of home sewers hit a wall. It stretches under the needle, skips stitches, and comes out wavy on the other end. The standard foot wasn’t built for fabric that moves — and that’s exactly the problem.

A knit foot has a small rubber pad on the sole. That pad grips the fabric and holds it steady under the needle without allowing it to stretch or shift during stitching. The movement of the fabric is the main reason you get skipped stitches and distorted seams on jersey, lycra, and french terry.

Don’t confuse this with a walking foot. A walking foot coordinates multiple layers. A knit foot stabilizes stretchy single-layer fabric. Two different problems, two different tools.

👉 Knit foot on Amazon

5. Walking Foot (Even Feed Foot) — For Thick, Layered, or Quilted Projectswalking foot vs regular presser foot

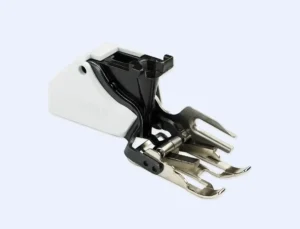
This is the bulkiest and most expensive foot on this list — but it earns every penny when you’re working with quilts, denim, leather, or anything with multiple layers.

Here’s what happens without it: the feed dogs pull the bottom layer of fabric forward while the presser foot drags on the top layer. The two move at slightly different speeds. By the end of a long seam, your layers are misaligned. With a walking foot, a built-in set of feed teeth on top works in sync with the feed dogs below — both layers move at exactly the same rate.

For quilts, thick coats, matching plaids, or any project where alignment really matters, this foot is non-negotiable.

Compatibility note: most home machines use a low-shank attachment, but walking feet are often brand-specific. Double-check the shank type before you order.

👉 Walking foot on Amazon


Want to understand your machine well enough to prevent most breakdowns yourself? I wrote a straightforward guide specifically for home sewers — Basic Guide to Sewing Machine Repair: How to Prevent and Fix 80% of Common Breakdowns. No dry technical manuals — just practical, real-world guidance from someone who’s seen every failure mode there is.

6. Teflon Foot (Non-Stick Foot) — For Leather, Vinyl, and Faux Suedeteflon presser foot for leather

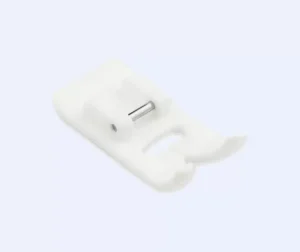
Try sewing faux leather with a standard metal foot and your machine will stall halfway down the seam. Metal grips the polymer coating of the material and the whole thing just stops moving. Some people try laying tissue paper over the fabric or rubbing the foot with oil. Both solutions are messy and mediocre.

A Teflon foot has a non-stick polymer sole that glides over leather, vinyl, patent fabric, and coated materials without catching or dragging. The seam comes out smooth and even, no interruptions.

If you ever sew bags, belts, faux leather jackets, or anything with a slick surface — this foot belongs in your kit.

👉 Teflon foot on Amazon

7. Rolled Hem Foot — Professional Edges on Delicate Fabricbest presser feet for sewing machine

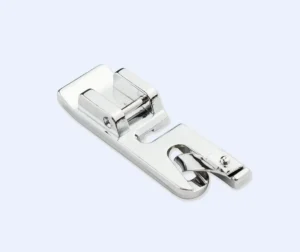
Hemming chiffon or silk by hand means pressing, basting, pressing again, then finally stitching. That’s close to twenty minutes per yard of edge. A rolled hem foot does all of that in one pass.

The foot has a spiral scroll on the underside that curls the raw edge of the fabric into a tight, clean roll and feeds it directly under the needle — no prep work, no basting.

Honest warning: this is the trickiest foot on this list to master. The first few inches are going to be rough for everyone. The key is feeding the fabric into the scroll at the right angle and keeping a steady, slow pace. Once you get the feel for it, hemming a scarf or a ruffle takes a few minutes instead of the better part of an afternoon.

👉 Rolled hem foot on Amazon


Disclosure: Links above are affiliate links. At no extra cost to you, I may earn a small commission if you purchase through them. As an Amazon Associate, I earn from qualifying purchases.

Quick Reference: Which Foot Should You Buy First?

Presser FootBest ForLearning CurvePriority
Overcast footClean edges without a sergerLow⭐⭐⭐⭐⭐
Invisible zipper footHidden zipper installationLow⭐⭐⭐⭐⭐
Straight stitch footPrecise seams on any fabricLow⭐⭐⭐⭐⭐
Knit footStretchy fabrics, no distortionModerate⭐⭐⭐⭐
Walking footQuilts, layers, thick fabricsModerate⭐⭐⭐⭐
Teflon footLeather, vinyl, coated materialsLow⭐⭐⭐⭐
Rolled hem footChiffon, silk, delicate fabricsHigh⭐⭐⭐

Why You Should Skip the “50 Feet for $12” Sets

Those giant sets on discount marketplaces look like a steal. And I understand the appeal — especially when you’re just getting started. But in practice, you’ll use maybe 20% of what’s in the box. The rest sits in a drawer forever.

The bigger issue is quality. Cheap feet often have poorly finished soles with rough edges or uneven polish. That kind of surface will snag delicate silk, leave marks on leather, and drag on knit fabric. Beyond ruining your project, a poorly made foot puts extra strain on the feed mechanism and causes wear that shows up later as a repair bill.

A small set of 5–7 quality feet from a reputable brand will serve you better in every way. When the geometry of a foot is right, your machine runs quieter, feeds more smoothly, and lasts longer. That’s not a small thing.


Compatibility: High Shank vs. Low Shank — Don’t Get This Wrong

Before ordering any presser foot, you need to know your machine’s shank type. This is one of the most common reasons people end up returning accessories.

Most modern home machines use a quick-release snap-on adapter, but the shank height varies:

  • Low shank — the most common type; found on the majority of home sewing machines
  • High shank — found on some semi-professional and older models
  • Slant shank — less common, associated with certain vintage Singer machines

The type of bobbin system (front-loading vs. top-loading) can also affect the needle opening width on certain feet. When in doubt, look up your exact machine model before buying. It takes two minutes and saves a return shipment.


One Thing That Ruins Results Even With the Right Foot

Buying the right foot is step one. Step two is adjusting your machine to match it.

When you switch feet, you often need to tweak thread tension, presser foot pressure, and stitch length. This matters most with the walking foot and the rolled hem foot. Always run a test seam on a scrap of the same fabric before starting your actual project. That thirty-second habit will save you more fabric than you’d expect.

If you want a solid foundation for understanding how your machine works — and how to fix it when something goes wrong — my guide Basic Guide to Sewing Machine Repair covers exactly that. It’s written for home sewers, not technicians, and focuses on the practical stuff: what to adjust, what to listen for, and how to catch small problems before they become expensive ones.


Bottom Line

Seven feet. A small investment. A big difference in what your machine can do. The overcast foot, invisible zipper foot, and straight stitch foot are worth buying right now — no hesitation. Add the knit foot, walking foot, and Teflon foot as your projects demand them. Save the rolled hem foot for when you’re ready to work with delicate fabrics seriously.

Your machine is already capable of more than you think. It just needs the right tools.

Keep Learning & Fix Your Sewing Machine Faster

If you found this guide helpful, don’t stop here. Most sewing machine problems are easier to fix when you understand how your machine really works.

Check out these helpful guides:

👉 Explore more articles on the blog and learn how to fix your sewing machine like a pro.

And if you prefer video tutorials, subscribe to my YouTube channel where I show real repairs, common mistakes, and practical solutions step by step.

Want to fix your sewing machine like a pro? My book “Basic Guide to Sewing Machine Repair: How to Prevent and Fix 80% of Common Breakdowns” shows you step-by-step how to prevent and repair common issues.

Get it on Amazon

This is an affiliate link at no extra cost to you. I earn a small commission if you purchase through this link, which helps me keep creating helpful content.
As an Amazon Associate, I earn from qualifying purchases.

Leave a Comment

Your email address will not be published. Required fields are marked *